After taking a little break from blogging, I have come back feeling a little refreshed. This past weekend I indulged myself in whatever I honestly wanted to eat and now that it is the days leading up to Thanksgiving, I have become more conscious of what I am eating. Considering that Thanksgiving is just around the corner, I am also trying to eat some foods that are nothing like the ones that are to be served during the big meal. This is why I chose to pick up some endive when shopping at the grocery store.
For those of you who know nothing about endive, endive is a cool weather crop like lettuce with a crisp texture. Generally on the more bitter side, endive provides a whopping 289 percent of the recommended daily value for vitamin K in a two-cup serving, which is important for balanced blood coagulation. The kaempferol in endive (also found in other crucifers) has been found to naturally inhibit ovarian cancer cells. In fact, when these cells are exposed to it, they die. So eat up!
I knew that endive would create a perfect salad if I just added some bacon and a poached egg. With a little bit more inspiration, I added a few other key ingredients to create a lunch that kept me full and was something a little different than my usual meal. Check out the recipe!
Endive Salad with Poached Eggs, Bacon, and a Truffle Dijon Mustard Dressing
2 heads of endive, sliced in half and cored
4 strips of bacon, chopped
2 eggs, poached
4 tablespoons truffle oil
1 tablespoon white balsamic vinegar
1 teaspoon dijon mustard
salt and pepper to taste
red pepper flakes (optional)
In a small skillet, cook the chopped up bacon until crispy and then remove to onto a paper towel lined plate to drain. Separate the two heads to endive into two different bowls. Top with cooked bacon and a poached egg in each bowl. In a small bowl, mix together the truffle oil, vinegar, dijon mustard and salt and pepper. Drizzle on top of the salad and sprinkle the red pepper flakes as well. Enjoy!
Cook’s Notes: If you are not able to find endive but have the chance to find frisee instead, use that. However, it is much harder to find than endive is.
As weird as this may sound, I am obsessed with eating out of bowls. If you were to put every meal into a bowl, I would guarantee you that I would eat it.
Generally speaking, most people associate bowls with foods like soup, cereal, oatmeal, pasta etc and has become very popular in the term “breakfast bowls.” With that said, I figured I would create a “lunch bowl” that was low in carbs and every high in protein. As stated in a previous blog post, it is holiday season so it is very important to be conscientious of what we are putting into our bodies.
This adobo chicken bowl is super high in protein because of the chicken breast and black beans, and very low in carbs because I eliminated the rice. However, if you are a rice eater, go ahead and add some brown rice to this dish. Below is this SUPER easy recipe.
Creamy Adobo Chicken Bowl with Chorizo and Corn Salsa
In a large skillet, saute the chicken breast until they are just cooked through and remove. In the same pan, saute the onions until they are translucent. While the onions are cooking, shred the chicken. In a blender, add the whole can of chilis and adobo sauce, lime juice, chicken broth and greek yogurt. Blend until smooth. Once the onions are ready, add the chicken, adobo sauce and chorizo. Cook until warm. In a bowl, add the black beans, chicken mixture and top with corn salsa and cilantro. Enjoy!
Cook’s Notes: Depending on the chilis, the adobo sauce can be very spicy. If you like spice and are okay with the temperature, leave it alone. If not, go ahead and add more yogurt. I also really like to use the Trader Joe’s Corn Salsa because it is super easy and very yummy!
Winter has finally arrived and to be honest, I really am in the dumps about it. The beautiful leaves have fallen off of the trees and the Appalachian Mountains are starting to look dull and grey. Because of this, I too am starting to feel a little grey.
One of the best ways to get out of a slump is to eat healthy and foods that are full of nutrients to make you feel better. My go to food is always avocado toast. It is something that I actually have not eaten in quite sometime and I found myself wanting it. Not wanting to go to the grocery store and wanting to be a little more inventive, I raided my kitchen and was able to throw together a perfect avocado toast that kept me full for the rest of the day.
One of the most crucial parts to making a great avocado toast is having really good bread. Thus, I always make sure that I have some fresh locally baked bread from the bakery in addition to avocados in my house. I was also able to find some bread cheese, an ingredient that I used in the post Playing Around With the Classics. With these few ingredients in addition to some fresh tomatoes and garlic, this avocado toast turned into a meal worth having! Recipe is as follows.
Avocado Toast with Grilled Bread Cheese, Sautéed Tomatoes, and Balsamic Glaze
2 slices of artisanal bread, toasted
1 avocado, peeled and pitted
1 cup of cherry tomatoes, sliced in half
1 tablespoon olive oil
2 garlic cloves, crushed
4 slices of bread cheese, grilled on all sides
2 Tablespoons balsamic glaze
2 teaspoons hemp seeds
salt and pepper to taste
In a small skillet, grill the bread cheese on high until all sides are browned and crispy. In another small skillet, heat up the olive oil over medium high heat and add garlic. Sauté garlic until fragrant and add the tomatoes. Reduce heat to medium low and cook until the tomatoes begin to soften and season with salt and pepper. Meanwhile, toast your bread and smooth one half of avocado on each piece of toast. Evenly split the bread cheese on each piece of toast and top with the sautéed tomatoes. Then top with balsamic glaze as well as hemp seeds. Enjoy!
Cook’s Notes: if you cannot find bread cheese, halloumi works just as well. If both cheeses are unavailable to you, go ahead and use your favorite type of cheese like goat cheese or mozzarella!
Referring back to one of my very first blog posts, Egg-actly What I Needed, I talked about the benefits of probiotics and once again I will reiterate the wonders of these live bacterias.
Probiotics are live bacteria and yeasts that are good for your health, especially your digestive system. We usually think of bacteria as something that causes diseases. But your body is full of bacteria, both good and bad. Probiotics are often called “good” or “helpful” bacteria because they help keep your gut healthy.
Because this blog post is about showcasing Kimchi and the different ways one can eat this ingredient, it is important to point out the type of bacteria that Kimchi has. Lactobacillus, the most common probiotic, can be found in yogurt and fermented foods like Kimchi. Different strains can help with diarrhea and may help with people who can’t digest lactose, the sugar in milk.
For those of you that have never really had Kimchi or are not that big of a fan of eating it in its natural state, this recipe is for you! After seeing a similar version of this dish on Buzzfeed, I figured I would make my very own take on the dish. By making a Kimchi quesadilla and accompany it with a Sriracha tomato soup, this dish is quick and easy and perfect for the cold weather. Below is the recipe.
Kimchi Quesadilla
2 tablespoons butter
1 cup cabbage kimchi, drained and chopped
4 fresh perilla or shiso leaves (optional)
2 (8-inch) flour tortillas
2 tablespoons sesame seeds, toasted
1 cup grated Sharp Cheddar
1 cup grated Monterey Jack
1 tablespoon Canola oil
Add the butter to a large skillet over medium-high heat. When melted, and the kimchi. Cook fo about 6 minutes, stirring occassionally, until the edges of the kimchi start to turn a little golden brown. Transfer to a bowl and let cool for a few minutes. Divide the kimchi, cheese, sesame seeds, and perilla leaves (optional) between the two tortillas. Fold each tortilla in half. Pour the oil into a large skillet set over medium heat. Add both folded tortilla to the skillet, cover, and cook for about 2 minutes per-side, or until they are golden browned and the cheese has melted.
Slice into serving portions, and serve.
Without a doubt, one of the things that I know how to do best is poach an egg. At an early age I became obsessed with making eggs benedict, and ever since then I have become completely preoccupied with eating poached eggs. I can literally put an egg on anything and make a full meal out of it. Because of this, I come up with new dishes during my spare time that would pair perfectly with a poached egg. Sometimes they are complete failures and other times, I come up with a dish that is worth sharing.
I knew that I had broccoli rabe in my refrigerator that needed to be used before it went bad as well as the eggs that I always have stocked in my refrigerator. Because I like to cut carbs and not eat very much of them, I figured that by pairing a poached egg with some broccoli rabe I could create a complete meal that would keep me full during the day. Broccoli rabe or broccolini is a green vegetable similar to broccoli but with smaller florets and longer, thin stalks.Common cooking methods include sauteeing, steaming, boiling, and stir frying. Its flavor is sweet, with notes of both broccoli and asparagus, although it is not closely related to the latter. Nutritionally, it is high in vitamin C and contains vitamin A, calcium, folate, and iron. It is extremely easy to cook, you can sauté it or even throw it on a baking sheet and bake it. By simply sautéing the broccoli rabe with some butter, shallots, lemon juice and lemon zest, I was able to create a simple “Italian” dish that is worth sharing! The recipe is as follows
Simple Lemony Broccolini with a Poached Egg and Shaved Parmesan Cheese
1 egg, poached
1 small shallot, thinly sliced
1/2 bunch of broccoli rabe
1 tablespoon lemon zest
1 teaspoon lemon juice
2 tablespoons butter
2 tablespoons shaved parmesan cheese
1 tablespoon pine nuts, toasted
salt and pepper to taste
In a medium sized skillet, melt butter and sauté the shallot until it starts to brown a little. Once the shallot is browned, add the broccolini and cook until it begins to soften. Add the lemon juice and lemon zest and quickly cover with a lid. This will allow the broccoli rabe to steam a little and soften. Add salt to taste. Once the broccoli rabe is ready, place on a plate and top with poached egg, toasted pine nuts, shaved parmesan and red pepper flakes. Enjoy!
If you are wanting to make a bigger portion of this, go ahead and poach some more eggs and make some more broccoli rabe. I created this recipe as a single serving. Now get poaching and enjoy!
One of my favorite go-to cuisines, other than sushi, is Thai food. I love the freshness of the ingredients and the nice, sometimes subtle spice. Thai food is known for its fresh herbs and spices as well as its use of chilis. Because of this, Thai food is a flavorful cuisine that is relatively very low in fat because it does not use oils when cooking. Other than the natural fat that comes from the meat, there is little to no added extra fat.
For the people that have some knowledge of Thai food, a big common dish is Pad Thai. Pad Thai is a stir-fried rice noodle dish commonly served as a street food and at casual local eateries in Thailand. It is made with soaked dried rice noodles, which are stir-fried with eggs and chopped firm tofu, and flavored with tamarind pulp, fish sauce, dried shrimp, garlic or shallots, red chili pepper and palm sugar, and served with lime wedges and often chopped roasted peanuts. While I do really love this dish, I wanted to introduce you all to one of my all time favorite Thai dishes that I generally always eat when I want to fill up on protein and not carbs. This dish is called Larb.
Larb is a traditionally northern Thai dish this can be described as a minced meat salad. Not only is it extremely easy to make, but it is super low in carbs and fat, making it the perfect meal for when you are trying to cut carbs or eat light. Below is the recipe.
Larb Chicken Salad
2/3 cup fresh lime juice
1/3 cup fish sauce (nam pla*)
1 tablespoon sugar
2 teaspoons Thai roasted chili paste* in oil or chili-garlic sauce*
3/4 cup canned low-salt chicken broth
1 1/2 pounds ground chicken
1 cup thinly sliced green onions
3/4 cup thinly sliced shallots
3 tablespoons minced fresh lemongrass*
1 tablespoon thinly sliced Thai chilies* or serrano chilies
1/2 cup chopped fresh cilantro leaves
1/3 cup chopped fresh mint leaves
2 small heads Boston lettuce, separated into leaves
*Available at Asian markets and some supermarkets nationwide.
Whisk first 4 ingredients in medium bowl to blend; reserve sauce.
Bring broth to simmer in heavy large skillet over medium heat. Add chicken. Simmer until cooked through, breaking up meat with spoon, about 8 minutes. Add green onions and next 3 ingredients. Stir until vegetables are tender and most of liquid has evaporated, about 4 minutes. Remove from heat. Stir in sauce, cilantro and mint. Season with salt and pepper.
Spoon into lettuce leaves; serve.
Cook’s Notes: One of the best parts about this dish is the flexibility of ingredients. You are more than welcome to use ground turkey in place for the chicken and if you want to make it vegetarian/vegan you can just finely chop up some tofu in substitution for the meat!
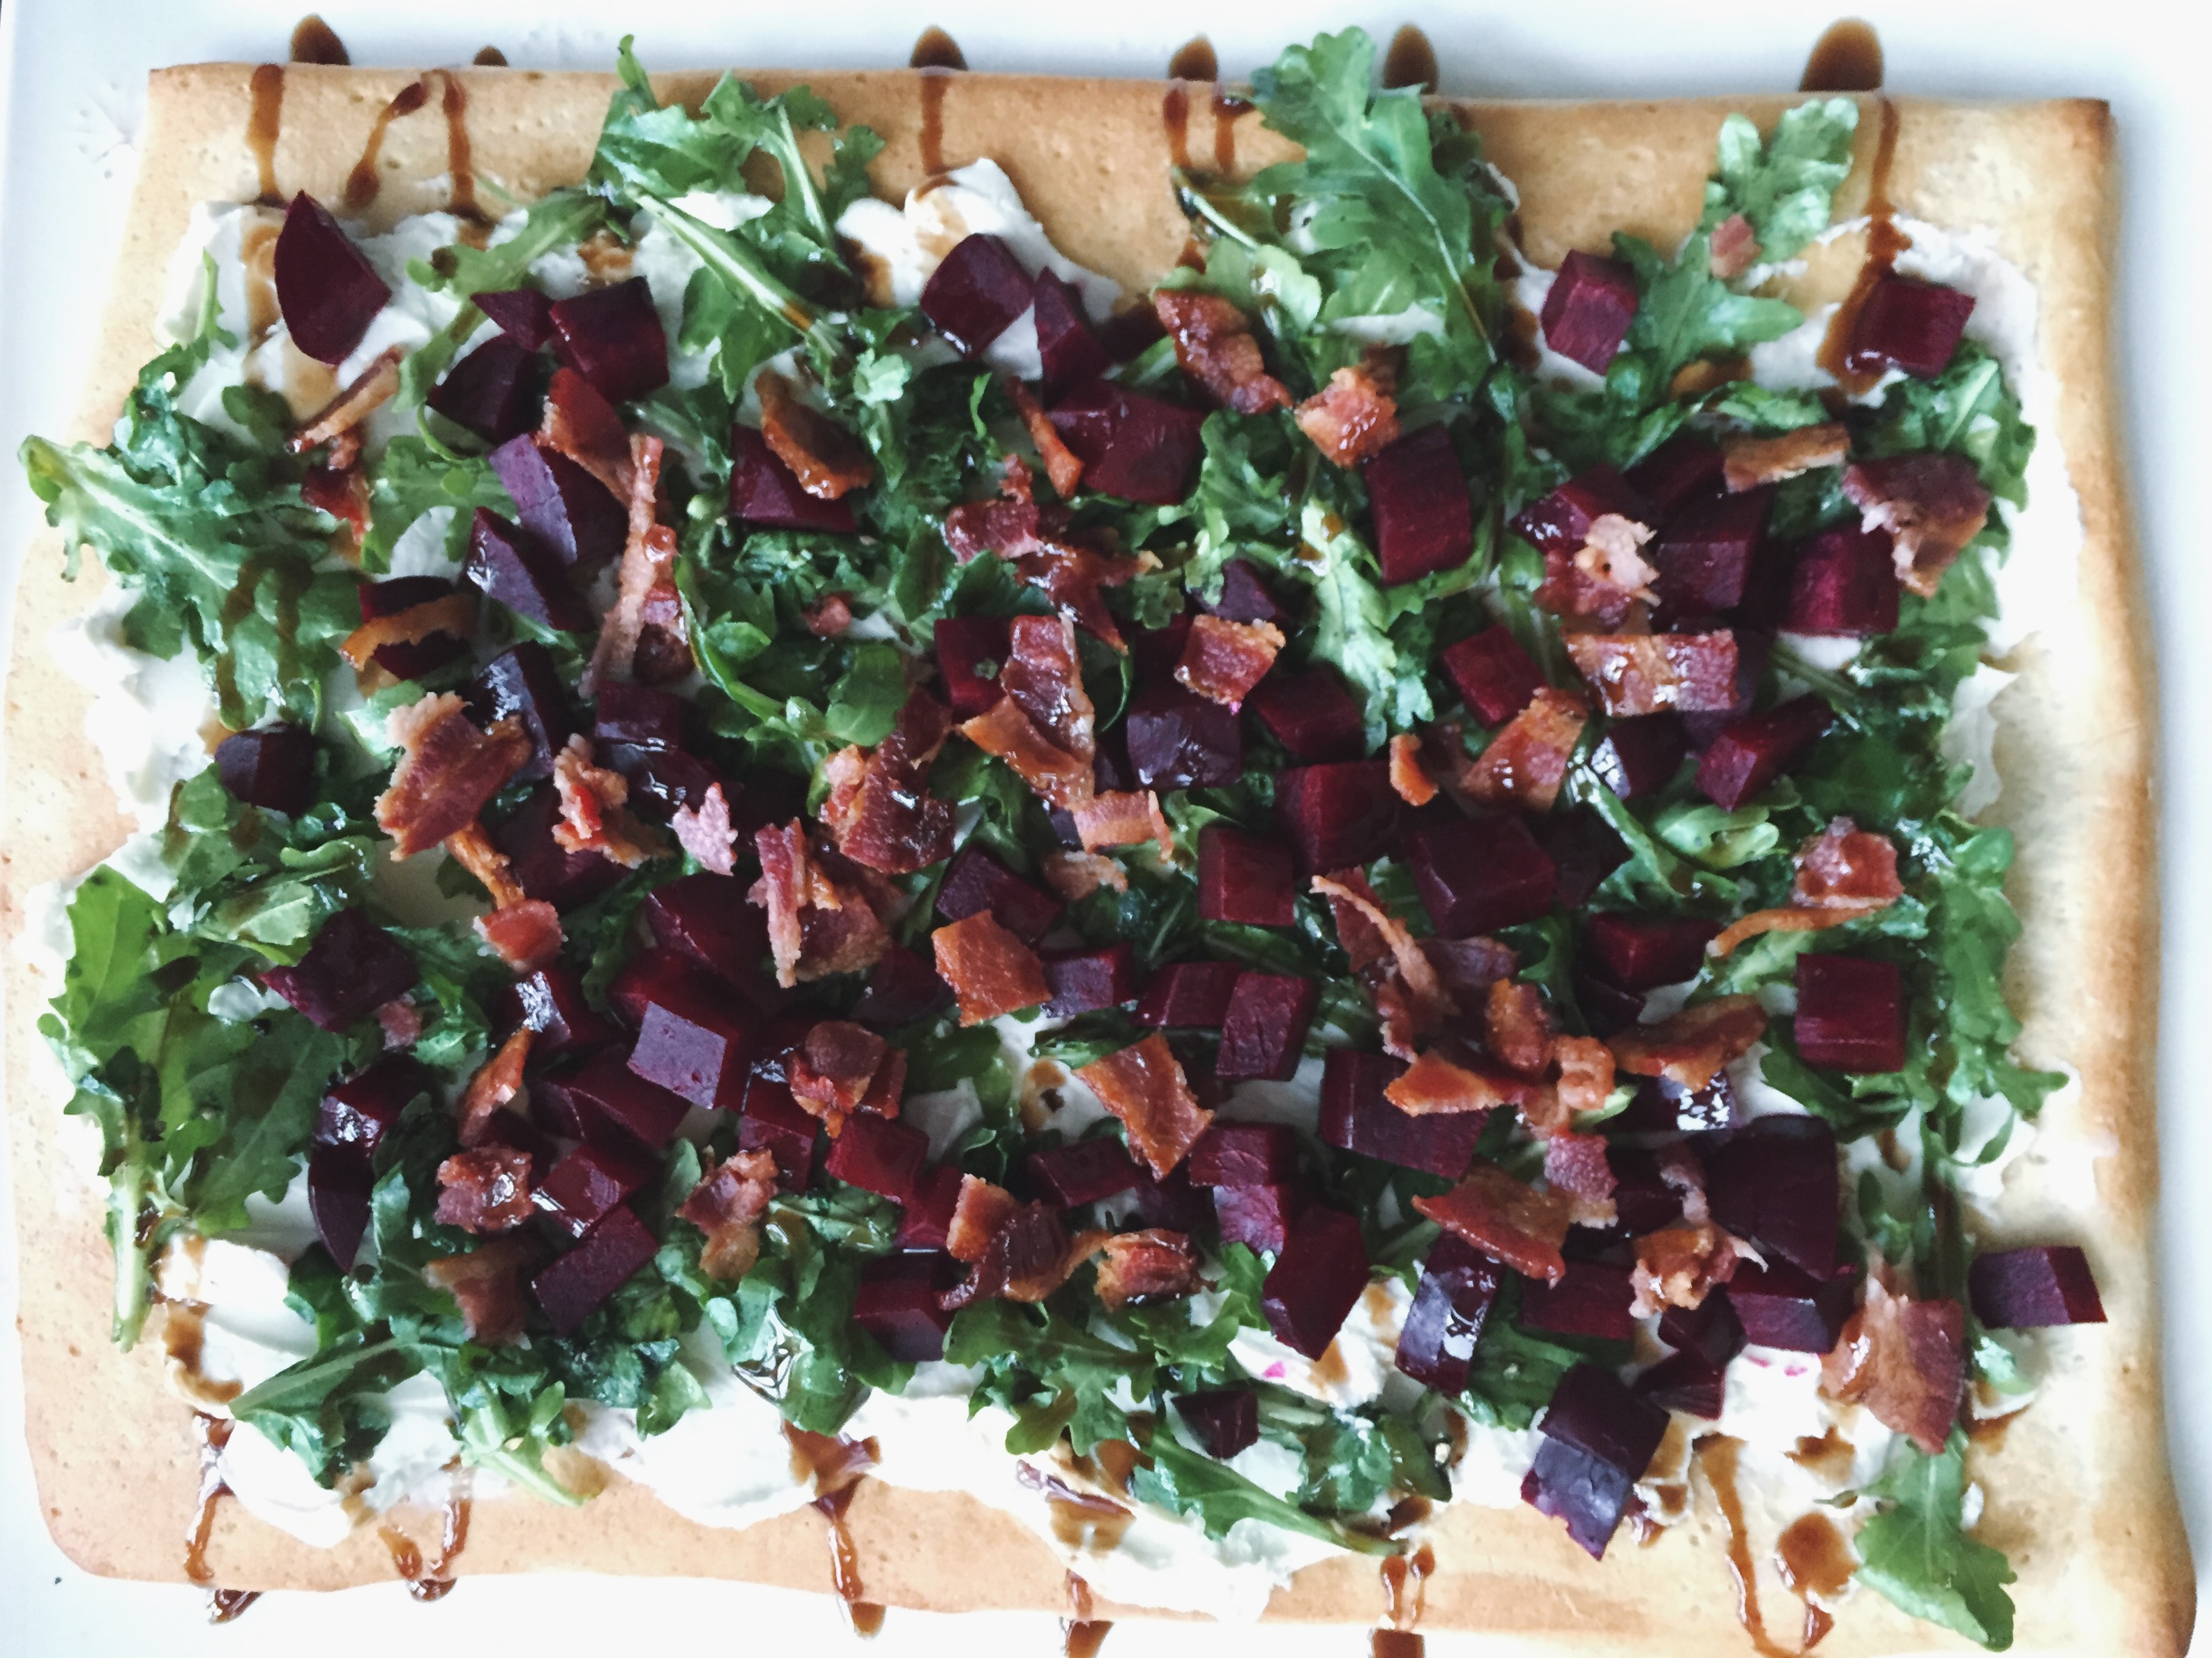
Now that the leaves are starting to change here at home, I am starting accept the fact that it is now fall. Other than the horrendous rain that Asheville as been receiving lately (thank you hurricane Joaquin), this is the best time of year to go hiking and enjoy the relatively cool weather. One of the main reasons that I do not like fall/winter very much is due to the heavy foods that are commonly eaten during this time of year. I understand the nature as to why rich foods are eaten during the cold season, but it really makes me feel quite drab about myself. I much prefer the beautiful produce that spring and summer have to offer and the light, cool dishes that are associated with those months. Some might call me weird or a Debbie Downer, but I can’t help but feel sad about food now of days.
Because of this, I find that it is important to feed the body and soul, but still try and stay in tune with the season. Beets are by far one of my favorite root vegetables. Ever since I was a little kid, I would eat anything that had beets in them, specifically pickled beets! Because I have some in the garden, I figured I might as well us them while they are fresh and make a dish that is “fall-ish” but also incorporates some of my favorite flavors.
Did you know that beets are high in immune-benefiting vitamin C, fiber and essential minerals like potassium and manganese? In addition to that they are full of nitrates which will help enhance your stamina. The nitrates turn into nitric oxide, which help reduce the oxygen cost of low-intensity exercise as well as enhance tolerance to high-intensity exercise! So athletes, eat up!!
I understand that not everyone is as enthusiastic about eating beets as I am, but I promise that this dish will make you want to at least tolerate beets. By creating a flat bread that is topped with beets, goat cheese, and bacon, it will satisfy your salty and sweet cravings and be beneficial to your health! The Recipe is as follows.
Wrap the beets in aluminum foil and roast in the oven until the beets are tender and a paring knife inserted in the center is met with no resistance, 45 minutes to 1 hour. Once cooked, set aside until they are cool enough to handle. Then, using a paper towel, rub the skin off the beets and then cut into moons or dice.
Gather up the rest of the ingredients and have them at the ready before you grill your bread.
Preheat a cast-iron grill pan, or a grill, to medium-high heat. Turn the dough out onto a floured work surface and stretch and press with your hands to form a thin, rectangular shape. If you need to, pick up the dough and let the natural weight of the dough stretch itself out. It doesn’t need to be perfect, matter of fact it is better when it’s not. Once you have the dough in the shape you like, brush one side of the dough with olive oil and lay that side down flat onto the preheated grill. Cook the dough until it is charred and has a crisp texture, about 5 minutes, brush the other side with some oil and then flip the dough and char the second side. Once the bread is charred and cooked, remove it from the grill and assemble the flatbread.
Spread the goat cheese onto the flatbread. Toss the arugula with some lemon juice, olive oil, salt and pepper and then place it on the flatbread. Top with sliced beets and crispy bacon and another drizzle of olive oil. Cut the flatbread and serve.
Simple Pizza Dough
In a liquid measuring cup, combine the warm water, yeast and sugar. Allow the yeast to dissolve and bloom, about 5 minutes. Once bloomed, add the olive oil.
Meanwhile, in the bowl of a stand mixer fitted with the paddle attachment, combine the flour and salt. Stream in the water/yeast mixture and as the dough begins to come together, switch to a dough hook attachment. Allow the dough to knead, adding a bit more flour if needed, so that the dough releases from the sides of the bowl, 1 to 3 minutes. You should be able to touch the dough and not have the dough stick to your fingers. Once the dough has kneaded and has pulled away from the sides of the bowl, remove the dough from bowl to a floured work surface and, with floured hands, continue to knead it by hand for 1 to 2 minutes. Then form the dough into a round ball and place it into a large bowl sprayed with nonstick spray. Cover the bowl with plastic wrap or a clean dish towel and let the dough rise in a warm area of your kitchen until it doubles in size, 1 1/2 to 2 hours. After the dough has risen it is ready to be cooked however you’d like!
Cook’s Notes: This dough is wet dough, keep bench flour at the ready and make sure to flour your hands when working with the dough. Trust your gut as a chef, if the dough is to wet, add more flour, if it is too stiff, add a little water.
Sugar is used to feed the yeast which will help the dough to grow. Bread flour will give you a chewier texture because the flour has more gluten. You don’t need to use a thermometer to get the water temperature, it should just feel warm to the touch
Cooks Notes: If you want to make this recipe a lot simpler and not make a homemade dough, I would recommend using Pillsbury Thin Pizza Crust. It will speed up the process of this flatbread. Also if you would like to make a vegetarian version of this flatbread, substitute chopped up walnuts for the bacon. Because I am a fan of balsamic reduction, I ended up adding a nice drizzle over the top of my slice! I hope you enjoy this recipe just as much as I did and start becoming a fan of beets!
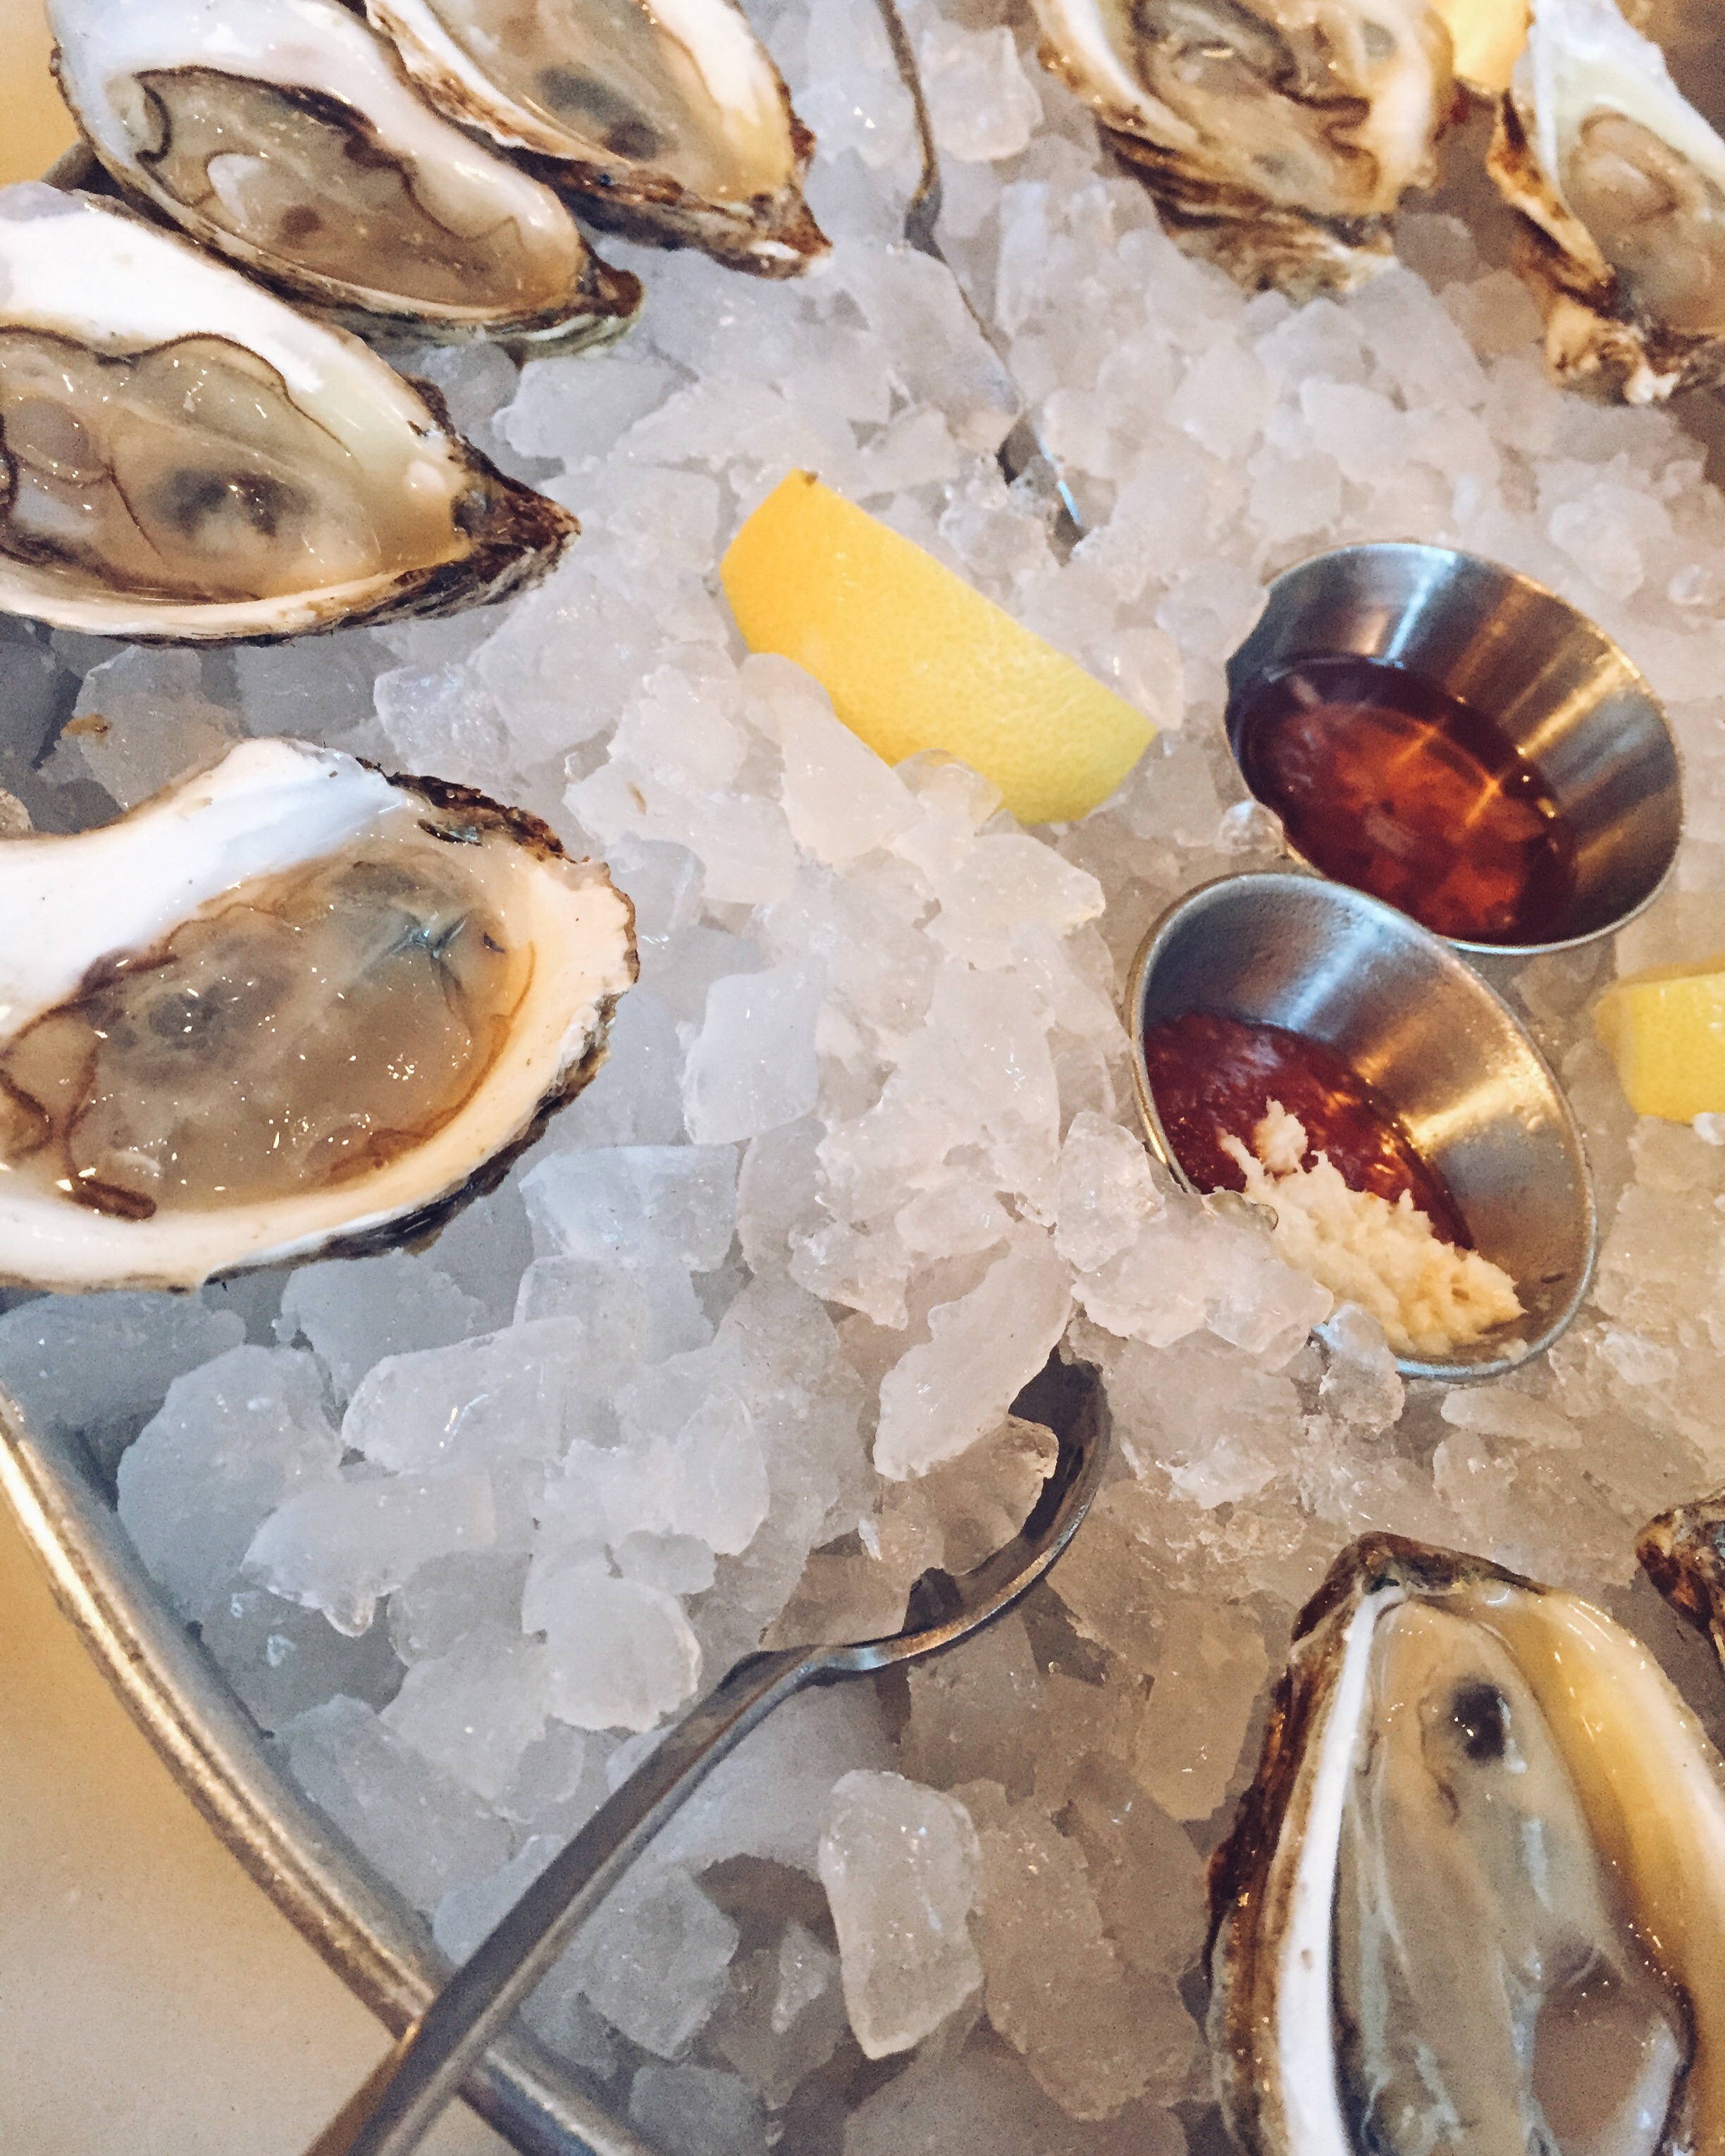
It is a well known fact that Charleston has great food, and for those of you who did not know that, now you do. Thus, if I didn’t eat my way around the city it would have been a complete shame and almost a waste of vacation, in my humble opinion. I am lucky enough to say that I have a few connections when it comes to this city. I have a great family friend who was one of the best chefs in the city and sent me here with a list of places that I just HAD to try. Knowing that I have a weak spot for trying anything and all things local, he directed me to restaurants that really showcased the local produce that this wonderful area has to offer.
The South Carolina Lowcountry is a a geographical and cultural region along the coast that was once known for its agricultural wealth in rice and indigo. With its rich diversity in seafood from the coastal estuaries, Charleston has a huge Caribbean and African cuisine influence. Some of the most common dishes are She Crab soup, Gumbo, Brunswick Stew, Shrimp and Grits, Crabcakes, Oysters, Frogmore Stew….the list goes on and on.
Processed with VSCOcam with a5 preset
Knowing that Charleston was a place where I could get fresh raw oysters, my first stop was at a restaurant called 167 Raw. Known for their raw bar (duh) and fresh seafood market, this restaurant is run by some of the cutest young males that are friendly and very knowledgable about their fresh produce. While this is a first come, first serve restaurant with maybe about 18 seats, it is a fast paced restaurant that was well worth going to. It was here that my family and I enjoyed a dozen oysters from PEI, Virginia, and Maine as well as Little neck Clams, Lobster Rolls, Tuna Burgers, Fried Oysters, Tuna Poke, and the Fresh Ceviche of the day. We sat right in front of the chefs who were friendly and took their time to get to know us a little before suggesting what we might want to eat. While there is sure to be a little wait at this quant little spot, it is definitely worth it!
Processed with VSCOcam with c1 preset
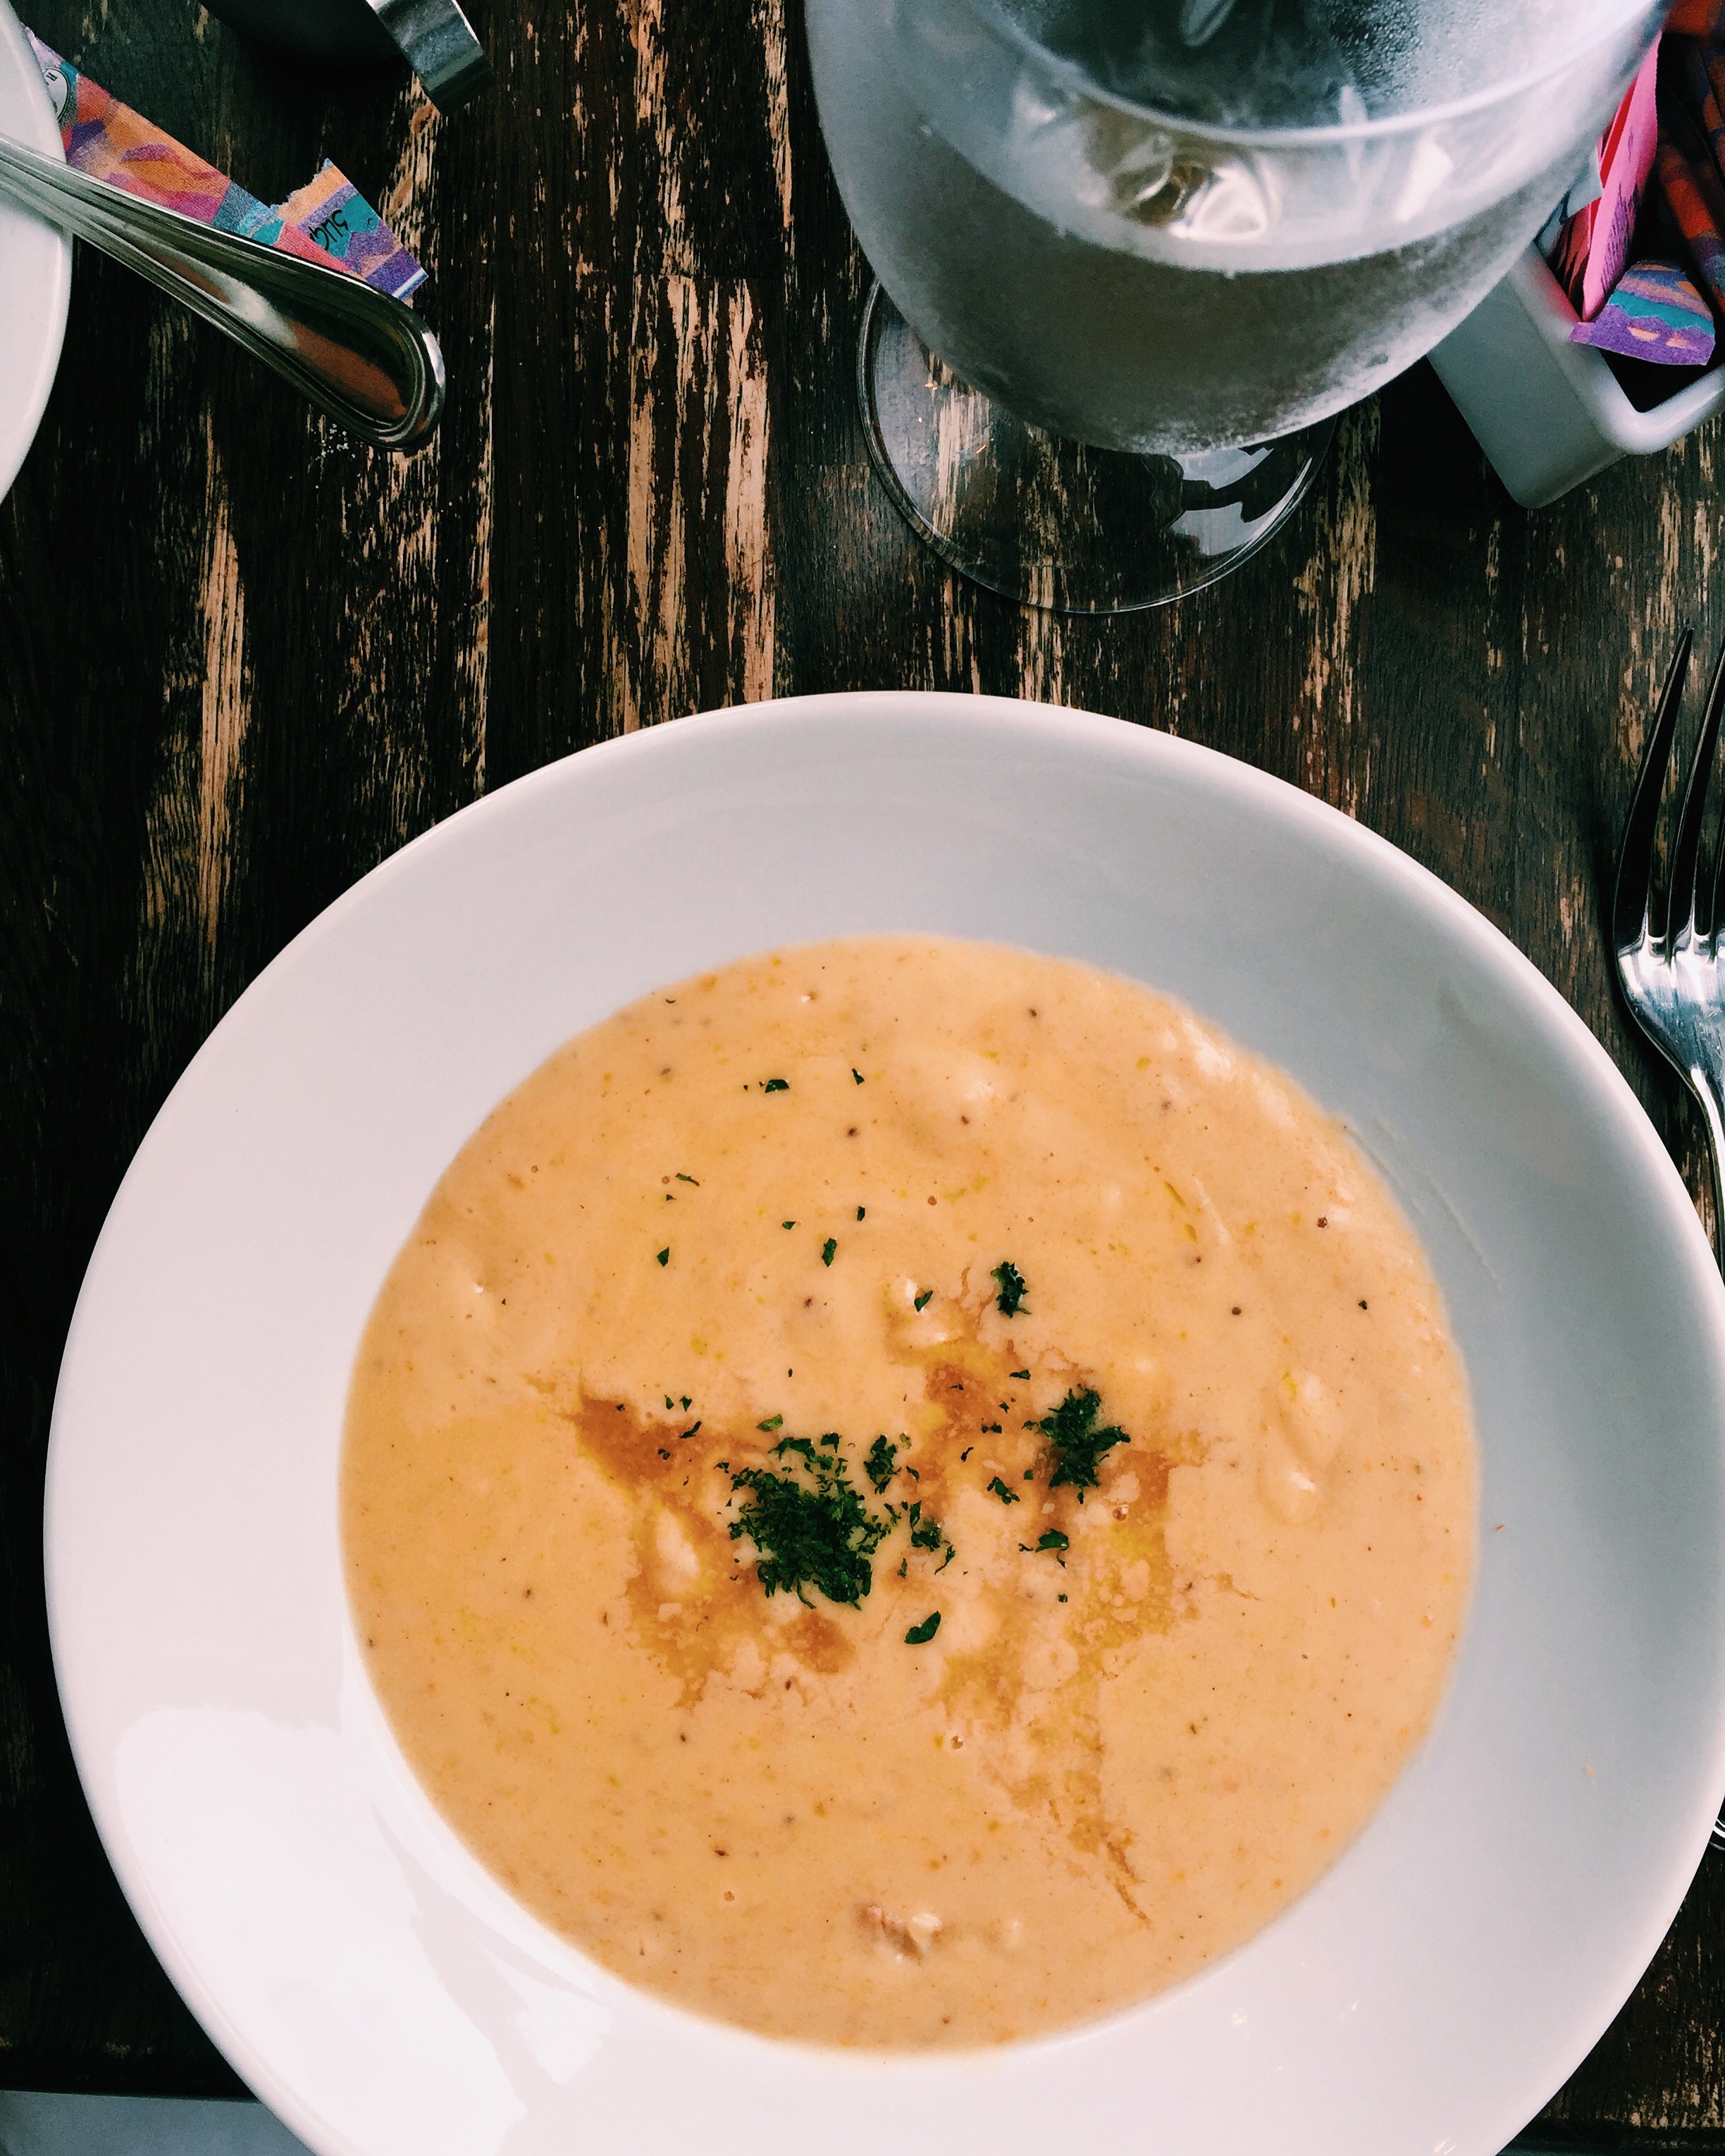
Because I have been coming to Charleston as a child, I knew that one of the best streets to go to in search of great food was King Street. King Street is the shopping meca of Charleston and it is here on Friday and Saturday nights where you will see it come to life with young college kids from the College of Charleston. It is also on this street where you can find Virginia’s on King. Virginia’s is a restaurant that specializes in the Low Country cuisine, but in a more refined manner. It was here that my mother and I spent our lunch time enjoying some She Crab soup and fried oysters. When one orders She Crab soup, it should always look orangish and have a nice little hint of sherry in it. The reason that it is colored orange is due to the orange roe that is incorporated into the soup, leaving a nice tint to the creamy dish.
One of my favorite restaurants that I have been coming to ever since I was in high school and perhaps my mother’s favorite Charleston seafood spot is Fish Restaurant located on North King Street. This swanky little restaurant is known and rated very highly for its fresh and seasonal innovative seafood dishes that highlight the finest local ingredients of the area. Because we ended up going on the night that they debuted their new fall menu, we were very eager to try what they had in store for us. Their dim sum is a great way to start the meal because you get a little taste of everything that they have to offer, but my favorite part of the meal was by far their snapper dish. Served with roasted spaghetti squash, butternut squash bread pudding, bok choy and onion consommé, this dish was to die for. Most importantly, it filled us up without making us feel weighed down for the rest of the night. If this is a place you would like to visit, I would recommend making reservations a week before coming because it is often times fully booked.
Processed with VSCOcam with hb2 preset
While Charleston is a great place to spend time and visit, if you get tired of the city feel and want to spend time on the beach, drive over the Arthur Ravenel Bridge into Mount Pleasant where you can find the beach and Mount Pleasant Farmer’s Market. Held every Tuesday afternoon, this Farmer’s market has everything from homemade pickles to freshly fried pork rinds and cracklin. It is also here where you can find homemade pastas by Rio Bertolini. Handmade in the heart of Charleston, this stand has all different sorts of pastas, ravioli, pierogis, and sauces to offer. Definitely worth stopping by and taking a look!
Even though I only listed off only a few of the restaurants that we ate at, these were the ones that left a lasting impression on me. There is nothing better than going to a restaurant that sources all of their ingredients from the local area. This is something that is becoming more and more mainstream in today’s society, and it is something that we should all be aware of when dining out!
It is less than 2 weeks until I have to be a DOPE Wildfox Couture Third Eye Bikini at the beach, which means that it is time to really be conscious of what I am eating. Eating healthy is something that comes second nature to me, but so does eating sweets. I LOVE SWEETS. My insatiable urge to eat cupcakes and gummies and coconut popsicles is beyond out of control, but it is time to reign that need in. Back to the land of salad greens, green smoothies, quinoa and veggies. I will have to admit, this past Labor Day Weekend I was a chowhound. I literally ate everything in sight from the candy corn that I picked up at the grocery store to the Cotton Candy Grapes that I end up finding. Cotton Candy Grapes you may ask? Well they are grapes that farmers have bred to taste exactly like cotton candy aka #flavortripping.
However, enough about my crazy eating habits and back to this blog post. I wanted to create something that would keep me feeling full, was full of flavor, and like everything else that I make, I wanted it to be Asian inspired. Recently, I have come across a lot of posts on Instagram that have do with Korean food. YUM! One of the most well known Korean dishes is called Bibimbap. Bibimbap is a Korean signature dish that literally means “mixed rice.” It is served in a bowl of warm white rice that is topped with sautéed and seasoned vegetables, red chili pepper paste and soy sauce. A raw or cooked egg and sliced meat are common additions to this dish. Generally, the ingredients are plated separately and they are completely mixed in right before eating. Because I not only love the way that this dish is plated as well as the ingredients that are used, I wanted to create my own version.
Most people who know me know that I really hate rice, unless it is in my sushi. Thus, instead of using rice, I wanted to use mung bean or cellophane noodles. I also wanted to make this dish vegetarian as well as gluten free. So after scavenging through my always packed refrigerator, I was able to throw this dish together without even having to go to the grocery store! Win! Below is my recipe!
Mung Bean Noodle Bibimbap
1 serving of mung bean noodles (generally one small round ball) hydrated according to package
1 fried egg
1/4 cup chopped tofu
1 small red onion sliced
1/4 cup seasoned rice vinegar
1/2 avocado, chopped
1/4 cup of Shibazuke (can be found at local Asian market)
Slice the red onion very thinly and in small bowl, add seasoned rice vinegar and let sit for about 15 minutes. This way they can pickle while you prepare the rest of the dish. In a small sauté pan, heat 1 teaspoon of sesame oil and saute mushrooms and tofu separately adding some liquid aminos or soy sauce for flavoring. Once you have the toppings prepared, make sure they you have them all separated and ready to use. Place your noodles in a bowl and top with 1 tablespoon of liquid aminos or soy sauce and add 1 tablespoon of chili garlic sauce as well. Then fry up your egg and place it directly top of the noodles in the center of the bowl. Take each of the toppings separately and place around the yoke of the egg, almost like a color wheel. Once you have placed all of the ingredients on top of the noodles, enjoy!
What I really love about this dish is the versatility. If you prefer rice over noodles, go ahead and go the more traditional route. In addition to that, you can use meat like chicken or beef as well as all different kinds of vegetables like sautéed bok choy, cucumbers, eggplant, etc. The sky is your limit! It is also very filling and keeps you going for the rest of the day, thus I would recommend this as a lunch or even dinner! I hope you enjoy this dish and don’t forget to taste the rainbow!
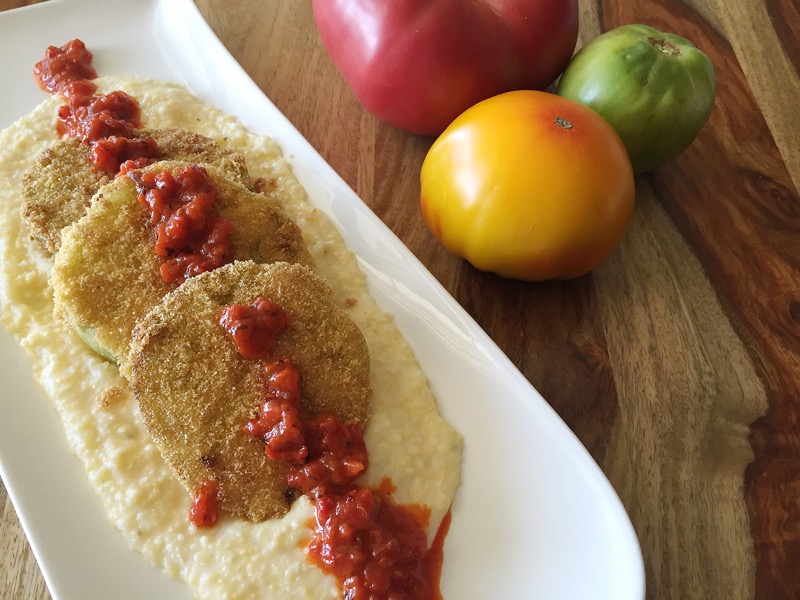
Everyday I go out into the garden to pick tomatoes and every day I find my mother’s beautifully ripen tomatoes half eaten. Unfortunately, my family garden is suffering from a case of groundhogs. While this terribly upsets me because I see both ripe tomatoes going to waste and whole green tomatoes just on the ground, I am trying to see the upside of this situation.
Here in the South, fried green tomatoes are a staple in our diet. While I generally do not eat many fried foods, this is my weakness. I have grown up my entire life eating this traditional dish both at home and in restaurants where you can get them served on a sandwich, over grits or even on salad. Due to the fact that I now have all of these green tomatoes, I was not going to let them go to waste. Thus I decided to make fried green tomatoes! Taking some inspiration from a local restaurant here in Asheville, Tupelo Honey Cafe, I used their recipe for fried green tomatoes and served them on top of some creamy goat cheese grits! Below is the recipe plus my own additions to make this a full dish!
Fried Green Tomatoes served on top of Goat Cheese Grits with a Fire Roasted Red Pepper Salsa
Follow the instructions on the back of the grits bag. It will take about 30-40 minutes. Once the grits are cooked, add the goat cheese and salt and pepper to taste.
Core the tomatoes and cut a thin slice off each end so the fruit is flat on both ends. Cut into 4 equal slices for large tomatoes or 3 equal slices for medium tomatoes. On a plate, mix the cornmeal, paprika, and seasoned salt. Set aside. Place the water and tofu into a food processor or blender and process until smooth. Pour the mixture into a shallow bowl.
Pour the oil into large cast-iron skillet or heavy saute pan to a depth of 1/2 inch and heat over medium-high heat until bubbling. Working in 2 or 3 batches, dredge the tomato slices, one at a time, in the tofu wash, allowing the excess liquid to drip back into the bowl. Dredge the tomatoes in the cornmeal mixture and place in the hot oil. Cook until golden brown on each side, about 2 minutes per side. Drain on paper towels before serving.
Serve the grits on a plate and top with fried green tomatoes. Top with fire roasted salsa and enjoy!
I personally really like this fried green tomato recipe because it uses tofu, which supplies protein! If you would like to keep this recipe vegan than do not add the goat cheese to the grits! I hope you enjoyed this dish just as much as I have my entire life! Now get frying and enjoy 🙂